Getting Started with Eclipse PHP Development Tools (PDT)
 Are you ready to take a step beyond writing code in a text editor like UltraEdit, BBEdit, or TextMate? Would you like to see those PHP and JavaScript syntax errors in the editor, without transferring files to the server or opening a browser? If so, then you're ready to jump into the world of the IDE — Integrated Development Environment. I'll compare the free, open source Eclipse IDE to a few of its commercial competitors Then we'll go through the steps to install Eclipse PDT All-In-One, the Zend Debugger, JSEclipse, and Subclipse.
Why an IDE? Let there be no mistake, I still love BBEdit and TextMate. I use both daily at work and at home for quick edits and I actually wrote this post in TextMate. But if you spend a good portion of your day writing PHP, an IDE will save you time in small increments by highlighting those unbalanced braces and missing semicolons, displaying PHP function arguments, and allowing you to debug your code right in the editor. There are commercial IDEs available and I've use a few of them. I tried an early version of Eclipse with the xored studio but the combo wasn't feature-rich and didn't perform as well as Zend Studio. I later switched from Zend to Active State's Komodo. I've been happy Komodo but it's sluggish performance on my PPC Mac drove me back to giving Eclipse another try. I started using Eclipse with PDT at work about a year and am amazed at how much PDT, formerly PHP IDE, has improved over the past four years. Eclipse is first a Java development environment, but extensions exist for a bunch of other languages, including Perl, Ruby, and Tcl. Okay, enough with the commentary, let's get to it, shall we?
Download and install Eclipse PDT All-In-One
Installation couldn't be easier. Visit the Eclipse PDT download page, select a stable build link, scroll down to the PDT All-in-One section, and select the download for your platform. http://download.eclipse.org/tools/pdt/downloads/ Once the download is complete, unpack and move the 'eclipse' folder to your Applications or Program Files folder. Fire up Eclipse, create a new PHP file or project, and code away. 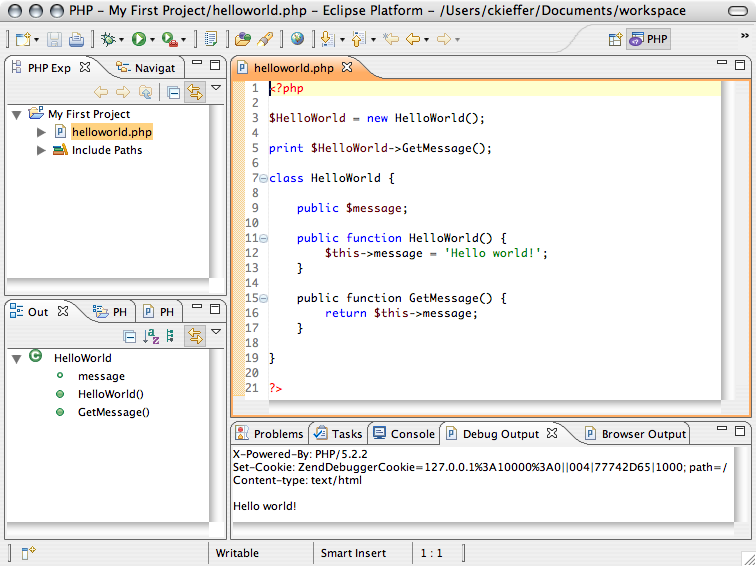
Install the Zend Debugger
Out of the box, Eclipse provides PHP syntax highlighting, code completion, PHP documentation, phpDoc support, and more. Local and server debugging, however, require the installation of XDebug or Zend Debugger extension. Here's how to enable local debugging with the Zend Debugger.
- Select Help->Software Updates->Find and Install
- Select Search for new features to install, click Next
-
Click the New Remote Site button...
- Name: Zend Debugger
- URL: http://downloads.zend.com/pdt
- Zend Debugger now appears checked in the Sites to include in search list, click Finish
- The update manager searches for the files to download
- All Zend Debugger options should be checked on the Search Results screen, click Next
- Agree to the licensing terms, click Next
- Select the Zend Debugger in the Features to Install screen, you can change the install location, but the default is recommended, click Finish
- Verify the Zend Debugger on the Feature Verification screen, click Install All
- After installation you'll be asked to restart Eclipse for the changes to take affect
You should now have a PHP Debug Perspective, complete with variable tracing, breakpoints, and CLI and browser debug output views. 
Install JSEclipse
To add improved JavaScript editing abilities to Eclipse, install JSEclipse from Adobe Labs. JSEclipse also provides editing support for popular JavaScript libraries, including YUI, Dojo, Prototype, and more. To install JSEclipse with the Update Manager
- Select Help->Software Updates->Find and Install
- Select Search for new features to install, click Next
-
Click the New Remote Site button...
- Name: JSEclipse
- URL: http://download.macromedia.com/pub/labs/jseclipse/autoinstall/site.xml
- JSEclipse now appears checked in the Sites to include in search list, click Finish
- The update manager searches for the files to download
- Check the JSEclipse version check box on the Search Results screen, click Next
- Agree to the licensing terms, click Next
- Select JSEclipse in the Features to Install screen, you can change the install location, but the default is recommended, click Finish
- Verify JSEclipse on the Feature Verification screen, click Install All
- After installation you'll be asked to restart Eclipse for the changes to take affect
To create a new JS file, select New->File->Other->Web->JavaScript. You should now have code completion and error highlighting for JavaScript files.
Install Subclipse
To add support for Subversion revision management you'll need to install Subclipse from tigris.org, the developers of Subversion. To install, let's use the Update Manager again.
- Select Help->Software Updates->Find and Install
- Select Search for new features to install, click Next
-
Click the New Remote Site button...
- Name: Subclipse 1.2.x
- URL: http://subclipse.tigris.org/update_1.2.x
- Subclipse now appears checked in the Sites to include in search list, click Finish
- The update manager searches for the files to download
- Check the Subclipse version check box on the Search Results screen. You may need to install dependent extensions for the Subclipse integrations (I didn't select integrations), click Next
- Agree to the licensing terms, click Next
- Select Subclipse in the Features to Install screen, you can change the install location, but the default is recommended, click Finish
- Verify Subclipse on the Feature Verification screen, click Install All
- After installation you'll be asked to restart Eclipse for the changes to take affect
To checkout an existing Subversion repository
- Select New->File->Other->SVN->Checkout Projects from SVN, click Next
- Create a New Repository, click Next
- Enter the URL for the SVN repository you want to checkout, click Next
- If the repository URL is secure, accept the SSL certificate
- Select the folder(s) to checkout
- Create a new Project, select the Project type, PHP Project in this case, click Next
- Enter a Project name, workspace, and any other project specific settings, click Finish
- You'll see an overwrite warning that any SVN repository files with the same names as Eclipse settings files, normally you shouldn't need to worry about this, click OK
- The project is checked out of the repository
 I've just started to use some of the data integration and design extensions available for Eclipse and will post a followup soon. In the meantime, happy coding!